This method takes account of both tide and leeway.
Here’s a four step guide to working out your Estimated Position.
- Plot a DR, but include leeway.
- Find out the tide experienced in your area between your fix and the time of the EP.
- From your plotted DR position, plot the tide
- The end of the tide is your EP
Lots missed out here!
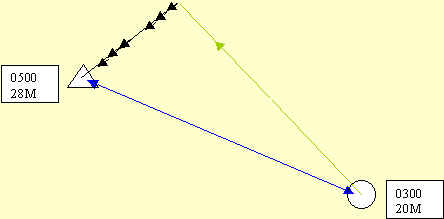
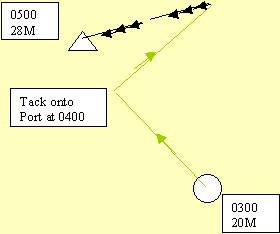
Notice that we are not making a good ground track for Fowey. We can either carry on doing one hour EP's, plotting the tide and Ep every hour like this.
Or if you are on a longer trip or just haven't had time to do an hourly EP, you can just add up your distance run, plot it then plot all the different tidal rates and streams on the end. As you can see, the result will be the same.
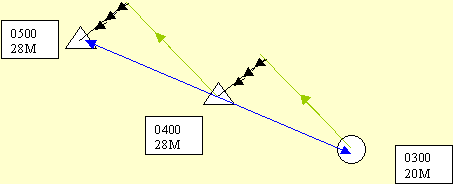
If you had to alter course for some reason eg tacking to windward, then you simply plot your water tracks including the leeway, then plot the tide on the end.
| CRUCIAL STUFF! |
|
Using Estimated position has lots of error.
- Your log will not always give you a true distance covered. See Module 1, Logs
- Your course steered may well not be accurate, due to helmsman error or various compass errors. See Module 1, Magnetics
- Leeway is hard to judge accurately, even with experience.
Because the boat does not go where we point it we need to be very careful. If there were a danger along the ground track then we would have hit it! Remember EP is finding out where we have been! not where we are going.
When the wind is against us we have no choice about our course. We steer as close to the wind as possible. Usually about 45º off. We have to EP.
This is where we take control of our destiny and work out a course to make best use of wind and tide, rather than simply pointing the boat and suffering them!
To learn how to shape a Course to steer, we will use the same situation as in EP above.
Here is a 5 step guide.
- Plot your desired Ground Track.
- Find out the tidal rate and direction in your area for the next hour.
- Work out your True Course to Steer, allowing for tide.
- Counteract your leeway.
- Convert to the Magnetic Course to Steer.
Lots missed out here
Even if you are only using your course to steer for a few minutes, you still draw the tidal vector for an hour. All those lines and arrows are a vector diagram. If your chart covers such a small area that you cannot plot the boat speed and tide for an hour then Mini vectors
If crossing the channel or your destination is more than one hour away, you could decide to compile a multiple tidal vector to stay on the fastest ground track over the whole passage. There are a few problems with this method. First you must be sure that the courses steered do not take your vessel over or too near to dangers. Second, for this method to work, your speed needs to be relatively constant throughout. (difficult on a sailing vessel!)
Here's how.
Using the tidal stream atlas (with the correct High water time pencilled in!)
Guess at a speed that your vessel is likely to make. Then mark off dead reckoned
positions
in the tidal atlas for each hour. Make a note of rate and direction at the DR for
each hour. Do
this until you have reached your destination, then count up the hours.
Next plot the required ground track, from the start point to the destination. From the
start point, plot all the tides as shown. From the end of all these tides, using
your boat speed multiplied by the number of hours that you found it would take,
scribe off an arc through the ground track to gain the course to steer.
| CRUCIAL STUFF! |
|